Friday, December 17, 2010

Some Santas Residing with my Sister...

Inspired by my friend, Allie's, post about the quilts she has given her sister over the years, here are a few Santa dolls I’ve made for my sister from Christmases past. The one in the wagon is my very first Santa (from a pattern in Santa Claus magazine in the 90s). These pictures were published, along with my Shanty Claus pattern, a few years ago in Australian Homespun magazine.


Thursday, December 16, 2010

Rockin' Around the Christmas Tree

Gulli and his friend decide to have a little musical interlude in the middle of the tree trimming festivities.

Monday, December 13, 2010

A Little Santa...

I just finished another small Santa based on a design in Art Doll Quarterly by Dianne Rawls Davis (Nov. Dec. Jan 2010). I had made one in July and it was so much fun, I had to try another! I used a small remnant of heavily textured upholstery fabric and trims that I had on hand.

It's Beginning to Look a Lot Like Christmas!

Here's Gulli and his little friend putting up the Christmas decorations! Dolls and outfits are by Goodreau.

Emu on the Loose in Southern NJ!

DH took this shot with his cell phone yesterday of an escaped emu on the side of the road near our house!

Friday, November 19, 2010

Shoes!

We had to paint our favorite shoes for lesson five of Jane's journaling class. I think shoes might be my new favorite subject!

Thursday, November 18, 2010

Gerbera Daisies

Here are my exercises for lessons three and four of Jane’s Watercolor Sketchbook Journaling class. I bought this Gerbera daisy plant at the Acme a few weeks ago and it has been such a patient little model. Best $4.99 investment I ever made!

Wednesday, November 17, 2010

Merrick is Going to California!

Merrick just sold from my Shanty Clauses site and is heading out to California! My sweet boys are leading lives of travel and adventure!

Hubert is Going to Guam!

Hubert sold at auction, but only went for the opening bid, which was kinda low. Either he somehow flew under the radar - or he and I seriously overestimated his appeal! (We thought he was cute as heck!) Hmmm, anyway, he’s going to a very nice customer on the other side of the world in Guam. How cool is that? He’s very excited!

Monday, November 08, 2010

Santa Auction

In honor of Veteran’s Day (November 11th), I have put one of my Santas up for auction on eBay with 100% of the proceeds to benefit Homes for Our Troops. They are a wonderful organization that builds specially adapted houses for severely injured soldiers. I do hope Santa Hubert does well. He’s actually my favorite. I’m paying for shipping so that all the money goes to this truly worthy cause...

Thursday, October 28, 2010

Watercolor Journal Class

In an attempt to learn some of her freewheeling journaling techniques, I enrolled in Jane LaFazio’s Sketching & Watercolor; Journal Style class at Joggles. It feels so strange to be working quickly with lots of intense color and water. My usual method for building up color is to lay down lots of glazes using only enough water to soften and diffuse the edges. This is much faster. Here are my exercises for week one and two.

Sunday, October 24, 2010

Fun wuith FME

I have learned so many things in the Free Motion Embroidery class I took at Joggles. Most especially, I learned that I can adjust the tension on my bobbin case and, contrary to the warnings of the sewing machine dealer, the universe will not implode! That, alone, opens up a whole new world of stitch possibilities. Anyway, I’m still working through the lessons - and will be for quite awhile. Thought I’d show you one of the exercises I just completed – an example of cutwork.

Tuesday, October 12, 2010

WISP (Work in Slow Progress)

This still needs a lot more beads, but I’ve been working on it for awhile and wanted to show an update. The base is this monoprint painting I did in Susan Sorrell’s monoprinting class a few years ago. At the time, I didn’t own an orange cat, but now I have two! This quiltlet always makes me think of Briar, my little pumpkin-colored cat with tummy troubles, who insists on being spoon-fed. He has to have pumpkin or sweet potatoes added to his food for proper elimination. For some reason, he also likes me to sing Bobby Rydell’s “Wildwood Days” while he eats. And so I do...

I’ve been working on my FME lessons. The course is great and I'm learning things I would have never thought to try on my own.

Sunday, October 03, 2010

A New Santa...

I’ve been really busy with a whole bunch of projects, one of which is taking Janet Clark’s fun and thorough free-motion embroidery class at Joggles. I have also been hand stitching and beading a couple of small art quilts begun in previous Joggles classes. And this afternoon, I finally finished a Santa that I started a couple of years ago. In 2008, I made a jacket out of some cool vintage upholstery fabric with little raised “needlepoint” flowers that my friend and neighbor, Linda, gave me. I never finished the doll because I couldn’t find just the right accessory for him to hold. A few weeks ago, while looking for something else, I happened to run across a little test of a faux needlepoint design I had stitched quite awhile back on my embroidery machine. I had forgotten that the motif was in the same exact colors as the jacket. So, I tea-dyed it, cut it out and hand stitched it to a small bag I made from a stained vintage towel. In my mom’s old sewing box, I found a piece of rust brown lace seam tape to tie the bag. Although this Santa can be displayed all year, he is especially nice for fall because of the harvest colors in his outfit.

Do you see the little hole in the gourd? That is a cat tooth mark - bad kitties!

Thursday, September 23, 2010

Miniature Santa Au Naturel...

A few years ago, I designed and made a small (doll-house scale) Santa Claus doll. I gave him as a little extra thank-you gift to one of my wonderful eBay customers. Anyway, I always meant to make another and just recently found my original pattern. The clothing pattern is missing – so I’ll have to redraw that.

I have a copy of a great old book, Dolls to Make for Fun and Profit, and the author, Edith Flack Ackley, recommends stitching small dolls by hand, so that’s what I did - and it was actually easier than following pencil lines by machine on something this tiny. Santa is a little less than six inches tall so he's just the right proportion for a 1/12 scale dollhouse. His arms and legs are wired for flexibility and I ran dental floss through the body to attach them. Next, he has to be gessoed and painted.

Saturday, September 18, 2010

Nature Journal: Swamp Maple (Acer rubrum) Leaves

Most of the maple trees are holding on to their green color (here, in southern NJ) but there are a few leaves that are beginning to change. I wanted to try out my new Pitt sepia pen so I used it to outline the leaves and add a little bit of stippling to my watercolor sketch.

This is the first year I have not mourned the passage of summer – and I’m really looking forward to cooler weather – and more autumn color! It has been ungodly hot here for the last couple of months!


Monday, September 13, 2010

Messin' with Photoshop..

I found a beautifully coloured single-lobed sassafras leaf on the ground this afternoon, scanned it with a piece of decorative paper and applied the poster edges filter. Be sure to click to enlarge to see the details.

Sunday, September 12, 2010

Vintage Barbie Clothes for Gene

Well, I wondered if the old Barbie patterns would work, scaled up, for Gene. Yes, they do! I enlarged the dress pattern 130.5% to fit my 15 ½” Gene doll. The fabric is a lightweight wool challis – a joy to work with! I’m going to make the matching coat like I did with Barbie, but I think I may make it shorter than the dress for even more of a retro look.

It’s important to remember that when the patterns are enlarged, the seam allowances get bigger, too! This is my second attempt on this dress because I forgot and used ¼” seam allowance the first time and the garment was too big! The adjusted seam allowance for Gene is 3/8" which is the default seam allowance on my sewing machine.

Saturday, September 04, 2010

After Earl...

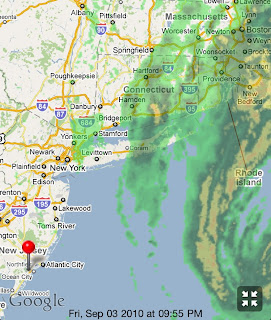
We went to the Ocean City (NJ) boardwalk last night to see if Hurricane Earl had made any sort of impact. There was a little rough surf but that was about it. Although it was a beautiful night, the place was pretty empty (as you can see in the photo from DH's iPhone) for the last big weekend of the summer season. How awful for the businesses there... Below is a radar capture (again, from the iPhone) showing where Earl was in proximity to the east coast last night and our location on the boardwalk in Ocean City.


Friday, August 27, 2010

Coordinating Coat...

Okay, I’m having some serious fun, here! The coat is made from a buttery soft microsuede-type fabric. I know that’s not authentic to the time period (late 50s – early 60s) but I liked how it coordinated with the dress. This particular pattern also includes pants, top, jacket and a skirt. I’m thinking I may try enlarging the pieces to fit my 16” dolls.

Sunday, August 22, 2010

Vintage Fashion Sewing for Repro Barbies

There was an article in the 2009 August issue of Haute Doll magazine about collecting and sewing old patterns for vintage Barbie dolls or reproductions. My most recent doll acquisition is the beautiful bubble blonde repro below. She arrived sans clothing and needed something to wear, quick! I found a vintage pattern for a simple sheath but it wasn’t lined. Well, I really wanted to add a lining but wasn’t quite sure how to go about it, so I searched the web and found this pattern for a lined dress for a larger doll and just followed the construction directions. I used “Silk Essence” as the lining material. Having never used it before, I’ve got to say it is wonderful stuff – lightweight, inexpensive and easy to work with – and comes in many colors! For the fashion fabric, I used a pretty scrap from my mom’s old stash. I'm not sure of the content but it is a very soft twill weave and is wrinkle resistant. The scale of the flowers is just right for Barbie. I love the way this dress fits! Next, I’m making a coat to coordinate with it.

Sunday, August 15, 2010

Finally Finished!

I don’t know if anyone remembers this WIP/UFO that I actually started to work on before I ever started this blog – over five years ago! Finishing it has been on my “to do” list for several years and, finally, I felt motivated to just “git er done!” This will go into a frame/tray that I purchased on EBay. The bottom image is the full size (about 10x14 inches); the top image is a scan of some details.

Friday, August 13, 2010

Man & Machine...

I took this photo the other day of DH using the backhoe to remove a humongous tree stump. He’s clearing out dead pines and also making room for a dedicated shed to house the tractor and its various attachments.

Wednesday, August 04, 2010

Monthly Art Experiment for August

This is a quick experiment in embossing a lace design on quilt batting. The instructions are here and call for bamboo batting, but I got a nice, well-raised texture using an old piece of heavy lace on "Warm and Natural" cotton batting. I'm thinking this is another way to get more mileage from damaged vintage lace.

Saturday, July 24, 2010

Another Monthly Art Experiment for July

I wanted to try “dyeing” plain fabric with water-soluble crayons. It’s so simple! I applied the crayons (Caran D’ache Neocolor II) very lightly to a piece of tightly woven muslin – then just brushed on water to blend. I kept the application of color very light because I wanted to use the fabric for a background to which I would be adding more color and stitching. I used a light box to trace a quick sketch of a zinnia from my nature journal onto the fabric, backed it with a piece of felt and then stitched it in black floss. The center is filled with French knots and straight stitches. I colored in the flower and leaves after I had finished stitching them, adding water to blend. Here is a great link showing the versatility of Caran D’ache Neocolor II water-soluble crayons (with tutorials) by wonderful artist, Fannie Narte.

I thoroughly enjoyed the whole process and plan on transferring more sketches to cloth. This one will probably be made into a postcard at some point. I will use my heat gun to set the colors.

Monday, July 12, 2010

They Grow So Quickly!

The first photo was taken July 8th; the second was taken today.


Friday, July 09, 2010

Monthly Art Experiment for July

I missed a couple of months of the monthly art experiment – just got a little busier than expected. But I’m back, baby – for this month, anyway. Here is a little Santa I just finished based upon an article in Art Doll Quarterly by Dianne Rawls Davis (Nov. Dec. Jan 2010). This guy was too much fun to make! And a big plus was that I was able to use stuff I already had. The tapestry used for his body was a left over scrap from a Santa I made about ten years ago. It was too small to do anything else with – but perfect for this project. I found the little sugared berry pick in a box of Santa-making supplies. The little tassels trimming his “hood” are vintage. His beard is wool from a llama. Might need to make a couple more of these!

Thursday, July 01, 2010

Robin's Eggs

This nest is just a few feet off the ground in the magnolia tree right next to the house. The eggs are my favorite shade of blue.

Saturday, June 26, 2010

Fur-lined Trooper Hat

I tried the hat again using faux fur as the lining. I just whipstitched it to the felt. Easy and reversible!


Wednesday, June 23, 2010

Winter Trooper Doll Hat

I have been working on an idea for a little trooper hat for dolls. I based it upon a simple vintage Barbie baseball cap pattern (no curved seams, just judiciously placed darts) and added the flap for neck and ears plus a lining. Here is my prototype made of wool felt and quilt batting modeled by Tiny Betsy McCall. This size can also be worn by 16” fashion dolls except for Ellowyne, who has a disproportionately big head! Next, I’m going to try making a reversible one with a fur lining. The little outfit is by Goodreau.


Tuesday, June 22, 2010

Wild Turkeys!

These wild turkeys have been hanging around for the past couple of days. I first saw one of them when I walked into the perennial garden right next to the house two days ago. She was resting on the ground and got up when she realized I was there. I was just a few feet away from her and surprised that she seemed reluctant to move away. When I looked down, I saw why. Little baby turkeys (poults) were scurrying in front of me to hide in the periwinkle vines. I quickly ran inside to get my camera (and to put some distance between myself and mom who looked none too pleased) but by the time I got back outside they were gone. Fortunately, DH was able to get these photos in the backyard early this morning.


Monday, May 31, 2010

Memorial Day & White Shoes - The Unofficial Start of Summer!

Here is one of my Goodreau BJD dolls (Innuendo) modeling a casual little summer outfit I designed over the weekend consisting of a lightly fitted, embroidered tee top and a slim skirt with a ruffle. The outfit also fits Ellowyne.

Monday, May 24, 2010

Instructions for Robe/Cover-up

I wanted to make another robe following my notes just to make sure I didn't forget anything before I published the directions. Modeling my little cover-up is Gene Marshall's wisecracking sidekick, Ivy Jordan. (I'm a huge fan of Eve Arden, so I had to add Ivy to my collection!) I purchased her sans outfit on Ebay but didn't want to keep her in the box until I found some clothes for her. So far, the robe fits (without any adjustments) Ellowyne, Gene, Goodreau BJD dolls, Tyler and friends and Madame Alexander Alex fashion dolls.

The directions are below. I hope you will try it - please let me know if you do or if there are any parts of the instructions that need clarification. If you have any questions, leave a comment and I will answer either here or via email.


All seams are 1/4". Rummage through your stash and find two compatible pieces of fabric. Pre-wash. Cut each 14" square. One will be the robe; the other will be the lining.

With the right side up, fold robe fabric in half toward you; then fold again, left to right. Measure 2 1/2" from folded edge and cut. Repeat for lining.

Measure and mark 3/4" out from top edge and 3/4" down from top edge. Draw a slight curve to connect the marks. Mark 2 1/2" down from shoulder on each side (as a guide for sleeve placement). Cut along curve for neck opening. Cut open down the center front. Repeat for lining. Mark 1" up from bottom edge on all sides to indicate side vents.

Cut sleeves 5x4" out of both robe and lining fabrics.

Right sides together (and using marks as guide for sleeve placement), stitch the 5" width of sleeve to the body. Press seams toward sleeves. Repeat for lining.

Right sides together, stitch lining to body, beginning at the vent opening mark on the lower side edge, all the way around the front and neck and back down to the vent opening mark on the other side. Stitch the lower back together, beginning at the side went opening mark and ending at the opposite side vent opening mark. Stitch the lower sleeve edges together. DO NOT stitch side or underarm seams, yet.

Clip corners and curves. Clip side vent openings to the mark. Turn right side out and press well. Fold back the sleeve edges 1/4" so that the lining fabric looks like cuffs. Hand baste to temporarily hold in place. Press well.

With lining side out, fold robe so that side seams are aligned, Stitch side seams, including underarm seams. Reinforce the underarms (about 1" in both directions) inside the seam allowance. Carefully slash where sleeve and body intersect. Zigzag or overlock seams to neaten.

Turn right side out. Press well. Try on doll and turn back collar.

For belt, cut a strip of the lining fabric 1 1/2" wide by 15" long. Fold in half, lengthwise. Press. Mark a diagonal line on each end (from the fold to the raw edge). Leaving a 1 1/2" opening in the center, stitch a 1/4" seam along the raw edges, and down the diagonal lines. Secure threads. Clip corners. Turn right side out. Press well and stitch the opening closed.

Sunday, May 16, 2010

Ellowyne’s New Robe

I have spent the past couple of days designing a quick and easy robe/ swimsuit cover-up for 16" fashion dolls. There is no pattern involved, just some simple measuring and cutting. As I was sewing, instead of haphazardly jotting down notes on scraps of paper (my usual modus operandi), I kept track of everything in a great program from Microsoft, called OneNote. I didn’t even know I had the program until a few weeks ago. It ships with Microsoft's Office Suite. And I don't know how I managed without it! You can assign notebooks to each of your personal and professional projects, add dividers, add or delete pages, add scans, audio and video clips - and cut and paste data from the web. The feature I like best is that you don't have to remember to save anything. It's all automatically saved.

Thursday, April 29, 2010

Monthly Art Experiment for April

For this month’s art experiment, I tried an alternate technique for making fabric paper. This time the backing is felt (for a nice cushioned effect) and a layer of plain tissue paper is fused to it (with WonderUnder). Then a collage of decorative paper, printed tissue paper, stamps and paints is applied. Here are a few of the resulting ATC backgrounds. Instructions for this great technique can be found, here, in an article by Pokey Bolton(Quilting Arts magazine).


Tuesday, April 27, 2010

Somers & Field

These girls (Willow Somers and Daisy Field) are responsible for my walk down Memory Lane or, more precisely, 1960s Carnaby Street. I originally purchased the mini dress pattern (previous post) for them. I love their hair, especially Daisy’s iconic asymmetrical Vidal Sassoon cut. And their make-up is perfect for the time period. I remember white lipstick – yikes! These dolls (made in 2000, I believe) are from designer Doug James, the same artist who designs the CED dolls. His attention to detail is amazing. There are updated, articulated versions of Willow and Daisy, named Violett Somers and Gabby Field, and I’ll probably be adding them to my growing collection, although I am trying hard to resist...really I am...

Sunday, April 25, 2010

"Quantized!"

Ellowyne found one of her mom’s old dresses in the attic – along with the de rigueur white “go-go” boots. Who didn’t have a pair of those back in the day?

I made the dress from this pattern.

The background is a big piece of lutradur I painted a few years ago in Susan Sorrell’s wonderful Personal Symbols class.

Friday, April 23, 2010

What I’ve Been Doin'

I don’t talk about work much, except to complain once in a while when it interferes with my play time! But, I have a little Flash assignment coming up and I had nearly forgotten how much I love that program! Almost as much as stitching! I tried to upload an example of what I’ve been working on but I couldn’t get Blogger to cooperate. Anyway, I’ve uploaded my little animation here if you’d like to have a peek.

Saturday, April 17, 2010

Boy with Toy...

Took this photo today of DH on his new tractor. He spent Christmas night, until 6:00 the next morning, digging a draining ditch in the front yard by hand. (We had water coming into the house from all the rain!) When he came in, he announced he was gonna buy himself a tractor – and so he did, dad-gummit!

Sunday, April 04, 2010

Tuesday, March 30, 2010

Monthly Experiment for March: Creating New Fabric from Scraps

Here is my experiment for March – just under the wire! It's a method for creating a unique piece of fabric by fusing fabric scraps, stamping with metallic paint, layering with sheer fabrics, machine stitching and cutting the sheer fabric to expose the stamped images. This is a technique I bookmarked to try (someday...) after first seeing it a few years ago in the Fall 2005 issue of Quilting Arts magazine (page 24). It is somewhat labor-intensive, but definitely worth further exploration...